
![What To Do When Bollard Cracks And Falls [Bollard Repair]](https://marcrete.ca/wp-content/uploads/2026/04/What-To-Do-When-Bollard-Cracks-And-Falls-Bollard-Repair-150x150.png)


Microcement For Bathrooms: How To Incorporate Microcement Into Your Bathroom Remodel
Microcement has become one of the fastest-growing bathroom design trends in Canada, especially among homeowners seeking clean, modern, and low-maintenance surfaces.
Its seamless appearance, high durability, and waterproof qualities make it a standout option for bathroom remodels from coast to coast.
As more Canadians look for minimalist surfaces that hold up to humidity and daily use, microcement has earned a reputation as a stylish alternative to tile, concrete, or stone.
This guide explains everything you need to know about incorporating microcement into your bathroom renovation from what it is, to where it can be applied, to how it performs in Canadian climates.
Whether you’re planning a full remodel or updating a few key areas, microcement offers versatility and long-lasting results.
Let’s get right into it.
What Is Microcement?
Microcement, also known as micro-topping or microconcrete, is a thin, polymer-modified cement coating applied in multiple layers over existing surfaces.
Unlike traditional concrete, which requires several centimetres of thickness, microcement is applied at just 2–3 millimetres while still offering substantial strength.
It consists of:
- Cement
- Fine aggregates
- Resins and polymers
- Mineral pigments
- Protective sealers
Because it bonds well to many surfaces—including tile, cement board, drywall, and stone—it has become popular in bathroom renovations where homeowners want a cohesive, seamless look without demolition.
Why Microcement Is Ideal For Bathrooms
Microcement is particularly well-suited for bathrooms due to its ability to handle moisture, humidity, and daily wear.
Waterproof And Moisture Resistant
With the proper sealers, microcement becomes fully waterproof—ideal for showers, floors, and wet zones. This is one reason it’s used frequently in spas and European luxury bathrooms.
Seamless And Grout-Free
Traditional tile installations require grout joints, which can stain or grow mould over time. Microcement eliminates grout entirely, creating a smooth, continuous finish that’s easy to clean.
Compatible With Underfloor Heating
Microcement performs very well with radiant heating systems. Its thin structure transfers heat evenly and quickly.
Durable And Scratch Resistant
Once sealed, microcement is highly resistant to abrasion, impact, and wear from bathroom traffic.
Slip-Resistant Options
Different textures can be chosen to provide grip in wet areas such as showers.
Adapts To Canadian Climate Changes
Because of its flexibility and thinness, microcement tolerates the moderate expansion and contraction that occur in Canadian homes.

Popular Bathroom Areas To Use Microcement
Microcement’s versatility makes it suitable for nearly any bathroom surface.
Shower Walls And Floors
These areas benefit the most from seamless waterproofing. Microcement creates a spa-like finish often seen in modern luxury hotels.
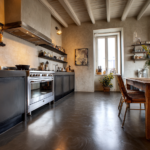
Bathroom Floors
The finish is comfortable underfoot, especially when used with radiant heating.
Vanities And Countertops
Microcement offers a smooth, stone-like appearance without the cost or weight of natural stone.
Bathtub Surrounds
Perfect for achieving a sculpted, monolithic look.
Built-In Niches And Shelving
Microcement can cover corners and curves beautifully.
Accent Walls
A single microcement wall adds depth and sophistication to minimalist bathrooms.
Design Styles You Can Achieve With Microcement
Microcement is not limited to the industrial or ultra-modern styles often associated with concrete.
Minimalist And Scandinavian
Soft greys, beiges, and whites highlight simplicity and warmth.
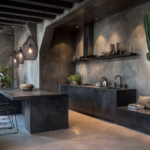
Industrial Loft
Darker tones and textured finishes create a dramatic presence.
Spa-Inspired Retreat
Smooth, calming surfaces enhance a peaceful environment.
Earthy And Organic
Warm mocha, clay, or muted olive tones work well in nature-inspired spaces.
Micro-Terrazzo Or Pigmented Finishes
Subtle speckles or coloured effects can be added for decorative interest.
With countless pigments and application techniques, microcement can replicate anything from polished stone to matte plaster.
How To Prepare Your Bathroom For Microcement Application
Preparation is the most important phase of any microcement project.
Check For Moisture Issues
Leaks, moisture behind walls, or poorly ventilated bathrooms must be addressed first. Microcement should never be applied over damp substrates.
Ensure A Solid Substrate
Microcement bonds well to:
- Tile
- Cement board
- Concrete
- Plaster
- Drywall
However, loose tiles, crumbling walls, or flexible surfaces must be repaired or replaced.
Clean And Degrease The Surface
Dust, soap residue, or oils prevent adhesion.
Level And Sand The Surface
Microcement reveals surface imperfections, so levelling is essential.
Prime For Adhesion
A specialized primer ensures the microcement bonds securely.
Without proper prep, even high-quality microcement won’t perform at its best.
Steps In The Microcement Installation Process
Primer Application
Creates a bonding layer for the first coat.
Base Coat With Mesh Reinforcement
A fibreglass mesh prevents cracking and strengthens the system.
Applying Multiple Microcement Layers
Two to three layers build colour, depth, and texture.
Sanding Between Coats
Ensures smoothness and uniformity.
Applying Protective Sealers
Waterproof polyurethane or acrylic sealers protect the final surface.
Curing Time
Microcement needs time to harden. Most installers recommend avoiding water exposure for 48–72 hours.
Because microcement requires skilled trowelling, hiring a trained tradesperson is strongly recommended.
Advantages And Limitations Of Microcement
Advantages
- Seamless aesthetic
- Lightweight and thin
- Bonds to many surfaces
- Customizable colours and finishes
- Low maintenance
- Ideal for modern and minimalist bathrooms
Limitations
- Requires experienced installation
- Sensitive to movement in substrates
- Surface variations may occur
- Needs proper sealing and maintenance
When installed correctly, microcement can last decades with minimal upkeep.
How Much Microcement Costs In Canada
Prices vary depending on project size and surface complexity. On average:
- $22–$40 per square foot for walls
- $28–$55 per square foot for shower areas
- $30–$60 per square foot for floors
Costs include labour, materials, primers, meshes, and sealers.
Compared to high-end tiles or stone, microcement offers a competitive price point—especially when factoring in reduced installation time and maintenance.
How To Maintain Microcement Surfaces
Regular care keeps microcement looking new.
Daily Cleaning
Use mild soap and warm water. Avoid abrasive scrubbers.
Avoid Harsh Chemicals
Acidic cleaners and bleach can damage sealers.
Use Protective Pads
Under heavy furniture or décor.
Reseal Every Few Years
Depending on bathroom humidity and usage.
Proper maintenance preserves slip resistance and lustre.
Microcement Vs. Tile, Epoxy, And Concrete
Microcement Vs. Tile
- Microcement has no grout lines
- More seamless and modern
- Faster installation
Microcement Vs. Epoxy
- Epoxy can look synthetic
- Microcement offers softer natural textures
Microcement Vs. Concrete
- Traditional concrete is thick and heavy
- Microcement is thin, lightweight, and flexible
Microcement provides more design flexibility than nearly any other material.
Mistakes To Avoid When Using Microcement In Your Bathroom
Common errors include:
- Applying microcement over damp surfaces
- Choosing the wrong sealer for wet areas
- Rushing the curing process
- DIY installation without experience
- Using poor-quality materials
Avoiding these mistakes helps ensure a long-lasting finish.
Hiring A Microcement Professional In Canada
What To Look For
- Certifications from microcement manufacturers
- Before-and-after photos
- Warranty on materials and workmanship
- Experience with bathrooms and wet rooms
How Long It Takes
Most bathrooms require 3–5 days depending on size and drying time.
A skilled installer ensures a flawless, durable finish.
Conclusion
Microcement is a versatile, durable, and stylish material that has transformed modern bathroom renovations across Canada.
Its waterproofing capabilities, seamless appearance, and compatibility with various design styles make it a top choice for homeowners seeking functional beauty.
With proper installation and maintenance, microcement can elevate your bathroom remodel and provide long-lasting value.
If you have any questions about our article “Microcement For Bathrooms: How To Incorporate Microcement Into Your Bathroom Remodel” or need microcement services in Toronto contact us at info@marcrete.ca or connect with us on social media.
FAQs
Is Microcement Waterproof Enough For Showers?
Yes, when sealed properly, microcement creates a waterproof layer suitable for showers, floors, and wet zones.
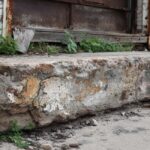
Does Microcement Crack In Canadian Winters?
Microcement is flexible, but poor substrate preparation or movement beneath the surface can lead to hairline cracks.
How Long Does Microcement Last In A Bathroom?
With proper sealing and maintenance, microcement can last decades.
Is Microcement Slippery When Wet?
Textured finishes can be chosen to increase slip resistance on shower floors.
Can Microcement Go Over Old Tile?
Yes, microcement bonds well to tile as long as the tile is solid and properly primed.
Does Microcement Stain Easily?
The sealer protects against stains from soap, shampoos, and general bathroom use.
How Soon Can A Shower Be Used After Microcement Installation?
Typically after 48–72 hours, depending on humidity and sealer type.
Can Microcement Match My Existing Bathroom Colour Scheme?
Microcement is available in hundreds of custom colours and tones.
Is Microcement Expensive Compared To Traditional Tile?
It can be similar or slightly more expensive, but saves labour time and reduces maintenance costs.
Do I Need To Reseal Microcement Regularly?
Most microcement bathrooms benefit from resealing every 2–5 years depending on usage.